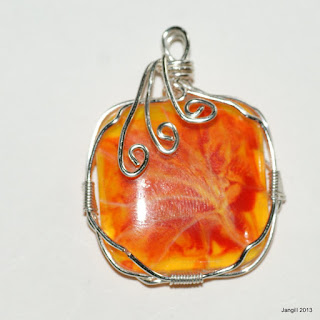
 This is a little bit more advanced than the tutorials I have posted to date. Nothing is difficult, but it helps to have worked with wire before.
I am demonstrating here with silver plated copper, but to start with I recommend using plain copper as it is nice and pliable without marking to easily. You will see why this is important a bit later :)
You will need
1" tile or cabachon
3 x 10" pieces of 0.8mm wire, square is best but I have use round here
20" 0.5mm wire, half round is best, but again I have used round here.
Round nosed and flat nosed pliers.
1. Lay out your three pieces of 0.8 mm wire side by side. Tape them together at the ends with masking tape.

2.Make a small hook on the 0.5 mm wire, hook over the three wires and start to wrap the wire close to the centre of the bundle. Take care to keep the wires flat next to each other. Cut the wire once the wrap is about 1/4 inch long and press down with your flat nosed pliers.

3. Bend the wrap to shape round the bottom half of your tile.

4. Make a wrap half way up each side of the tile on the wire bundle. Bend around the rest of the tile.

5. Bend the ends up ready to form the bail and closing wrap.

6. Make a bail loop with two of the wires, leaving the ends pointing down over the tile. Use a third wire to wrap round all wires to close the square.

7. Put your tile in place and bend all the corners of one wire in over the surface of the tile to hold it in place on front and back of your tile. This is the back. Use one of the wire ends curled round into a loop as a little decoration. You will have 3 ends left to decorate the front.
8. Make a scroll at the end of each of the last three wires and arrange them over the front of the piece.

At this point I would normally have finished except for polishing off my fingerprints. However, I was rather heavy handed bending the wires over the front of the tile and lost some of the silver plating in the bottom left. I thought I would leave it and show you how it can be rescued. In this case, I cut through the wire, trimmed the ends and rolled a couple of loops.
Because of the design on the tile, this works quite well as you now see more of the white "branches" stretching to the edge of the tile. A case of a Happy Accident this time.
We all get projects where we make a mistake. I used to start again as I could always see where the project hadn't gone to plan. Now I just go with the flow and see if I can turn the bad to good.
How about you, what are your favourite rescue solutions :)
Hope you enjoyed this project, Happy Crafting :)


Wow this is fabulous Janice. Love it.
ReplyDeletexx
This is gorgeous, Love the colour. Hazel x
ReplyDeleteGorgeous Janice!!! Loving the colour of the cabachon it is stunning.
ReplyDeleteHugs
Linda xxx
Really stunning thank you for sharing how you made it
ReplyDeleteLindsay xx
This is gorgeous Janice! Fab demo as well.
ReplyDeletexx
Fantastic project! I am definitely not ready for this technique yet!! Great tutorial.
ReplyDeletexx
Absolutely beautiful! Looks so easy to do!
ReplyDeletethank you!
Cheryl
Beautiful piece.
ReplyDeleteWhat a fabulous explanation of how you created this wonderful piece, on first seeing it, it reminded me of a pumpkin and I thought how lovely this would be as a fall pendant with a few added elements such as leaves etc. xx
ReplyDeleteThis is awesome!
ReplyDeleteAbsolutely gorgeous, thank you so much for the easy to follow tutorial x
ReplyDeleteAnother fantastic creation Janice, love the colour of the stone.
ReplyDeleteJanet