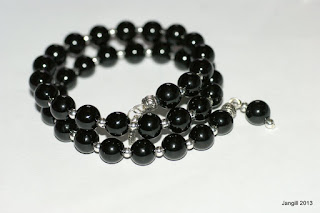
My Craft Creations 2 colours black and silver.
I love memory wire bracelets because they are so easy to wear. Just open out and wrap round your wrist where they keep their shape. They work for any size wrist.
This is a very easy project, the only tricky part is rolling the loop.
You will need
40 8mm Black Onyx beads
40 3mm silver plated spacer beads
2 x metal rope beads
1 x charm, 1 x jump ring
2 x head pins
2.5 coils memory wire
Heavy duty or memory wire cutters, round nosed pliers.

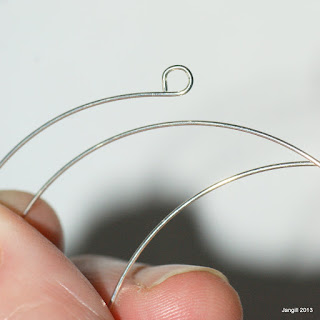
1. I buy my memory wire in one long slinky and cut off what I need for each project. In this case, cut off about 2.5 rounds. Roll the end over to form a loop using round nosed pliers. The memory wire is quite tough so you need to roll it over the pliers firmly. Adjust the holding position on the loop if you need to. (Alternatively you can buy end stops that glue in place with E6000 ).

2. Thread on your beads, reserving 2 spacers and one onyx bead for the dangle. Start with a metal rope followed by an onyx bead then a spacer. Carry on adding an onyx followed by a spacer until you are near the end, finishing with an onyx bead then a metal rope bead. Cut the memory wire to leave half an inch sticking out, roll this with your pliers to match the loop at the start.
3. Make a dangle. These are made in the same way as the beaded earrings. Take a head pin, thread with spacer bead and onyx bead, bend pin to right angle, thread on spacer bead and turn loop. Open the loop slightly and attach to one loop on the bracelet.
4. Open a 5mm jump ring, thread on a charm, thread the jump ring through the other bracelet end loop and close the jump ring. Make sure to wiggle the jump ring back and forth when closing to work harden it.
And that's it :) This project has endless design possibilities for completely different looks. The only thing to remember is not to use beads that are too long as they may break from the stress of the memory wire.
Have fun with this one and do let me know how you get on. Happy Crafting :)


Cool bracelet and one with your clear instructions I might even be able to make. Thanks for that. Best Regards, Wendy
ReplyDeleteWhat a beautiful bracelet. Easy to make. Thanks for sharing. Anita
ReplyDeleteHello, These are both gorgeous. Thank you for the instructions too. Lisa :)
ReplyDeleteLOvely bracelets & a great tut!
ReplyDeleteHUgs
Dawn xx
You do make them sound so easy! Beautiful bracelets.
ReplyDeletexx
Great tutorial, easy to follow and your finished bracelet is pretty! Thanks for sharing!
ReplyDeleteBeautiful bracelets Janice and thank you for your fab tutorial hun.
ReplyDeleteHugz, Lorraine xx
Oh I love doing these x love the black one very classy x
ReplyDeleteTwo gorgeous bracelets, thanks for the tutorial, I have bookmarked this so I can have a go too! x
ReplyDeleteFantastic bracelets, I love these :-) Elaine-xxx-
ReplyDeleteBeautiful bracelet.
ReplyDeleteGorgeous bracelets hun and fab tutorials, thank you for playing along at Emma's Crafty Challenge this month, good luck hun xxx
ReplyDeleteThank you for all your lovely comments :)
ReplyDeleteLet me know if there is anything you would like me to do a tutorial on :)
Stunning, great tutorial x
ReplyDeleteThank you for joining in Emmas crafty challenge x