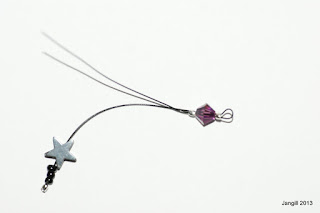
 These are a very simple make that goes really well on Craft or Market stalls.
They cost less than £1 to make and take about 15 minutes.
You will need :-
4 x Haematite stars 6mm
2 x Crystal bicones 4mm
12 x Seed beads 10/0
8 x crimp beads
10" black tiger tail cut in half
2 x Ear hook
2 x Jump ring
 1. Make a bend in the two pieces of tiger tail 2.25 inches from one end, making sure both pieces are bent at the same distance along.
2. Take one piece of tiger tail and bend the end over about an eighth of an inch. Thread on a crimp bead and close to cover the end. This gives a firmer hold than just crimping a bead on the end.

3. Thread on 3 seed beads followed by a star, a crimp bead, a bicone and another crimp bead. Thread the tiger tail back through the crimp, bicone and second crimp.

4. Adjust the tiger tail so the bend makes the top of the loop and place crimp bead, bicone and crimp bead just below the loop, closing the crimps in place.
5. Add a star and 3 more seed beads. Bend the end over as before and secure with a crimp bead.
6. Open a 5mm jump ring and attach through loop and ear hook of your choice. Make a second one in the same way
If you are not very confident closing jump rings, you can use a closed ring by adding it to the tiger tail after the crimp/bicone/crimp combination before threading back through the beads.
Tip for opening jump rings
Jump rings are usually slightly open when you buy them. Hold the jump ring either with pliers or in your fingers. Open the jump ring by twisting the ring slightly towards you on one side with pliers. Don't pull your hands apart as this distorts the shape - it is just a small twist of your wrist. Close by holding and twisting in the same way, giving a few tiny twists back and forth letting the ring seat level. You will feel little clicks as the ends touch. The little wiggle work hardens the metal so that it stays better in place.
Hope you like this tutorial and maybe it will give some inspiration :)
I would love to see your version if you try this - Happy Crafting, Janice


Thank you for the tutorial, the earrings are fab x
ReplyDeleteSuper cute! Love them!
ReplyDeleteI have no tiger tail, but I will get some and have a go at these!!
ReplyDeletethey look really good, just hope I will be able to do them.
xx
These are fab... Great tutorial Janice Px
ReplyDeleteAnother great tutorial and love the earrings too.
ReplyDeleteHugs
Linda xxx
Fabulous tutorial and those earings are gorgeous hun.
ReplyDeleteHugz, Lorraine xx
Great tutorial,gorgeous earings.xxx
ReplyDeleteThank you Ladies for your very encouraging comments :)
ReplyDeleteoooh these are so pretty! I can imagine them being a great seller :) x
ReplyDeleteI am struggling to see how they only cost £1! A great make. Thanks for sharing.
ReplyDelete