Monday, 8 April 2013

Cathedral Windows Pin Cushion Review


I am so annoyed with myself. 
I know I have an unreliable connection to the internet, but persist in writing my blogs directly in Blogger. I just lot almost an hour’s worth of work because the connection dropped off and the post hadn’t saved when I hit the publish button. I am now rewriting in Word ready to cut and paste!

Today's review is of a pincushion featuring a Cathedral Windows design using a kit from the The little Lavender Patch.
The kit contains all the fabric you will need plus the buttons for embellishment. The stuffing was not included which was clearly indicated on the pack
.
On opening the pack, I found 3 lovely quality printed cotton and one plain white cotton fabrics, plus 5 buttons for embellishing. Instructions were included plus a very small picture of the finished project. Great value for a kit that cost £3

The instructions started off well but became less clear as they went along, referring to pictures and colours I did not have. In the end I resorted to the internet to work out the cathedral window pattern. A few photos of the stages and clarity with regard to optional parts would improve the instructions enormously. With a kit, I think you are buying it especially for the instructions for that piece, so they need to be accurate. Otherwise, you may as well buy the components yourself.

The project is just the right size to learn the cathedral windows technique before attempting a larger piece. You will require some sewing skills before attempting this project. I completed the decorative panel by hand, but it could be machined.

The finished project is very nice and it was a fun little piece to complete in an evening. The completed cushion is about 4.5” square.

Value for money is excellent, but I would have preferred to pay a little more and have more comprehensive instructions

Have you completed any craft project kits? I would love to hear about your adventures :)

Happy Crafting,

Janice x


PS I've shared this on Handmade Monday at Handmade Harbour. There are lots of other great posts on there every week.

Saturday, 6 April 2013

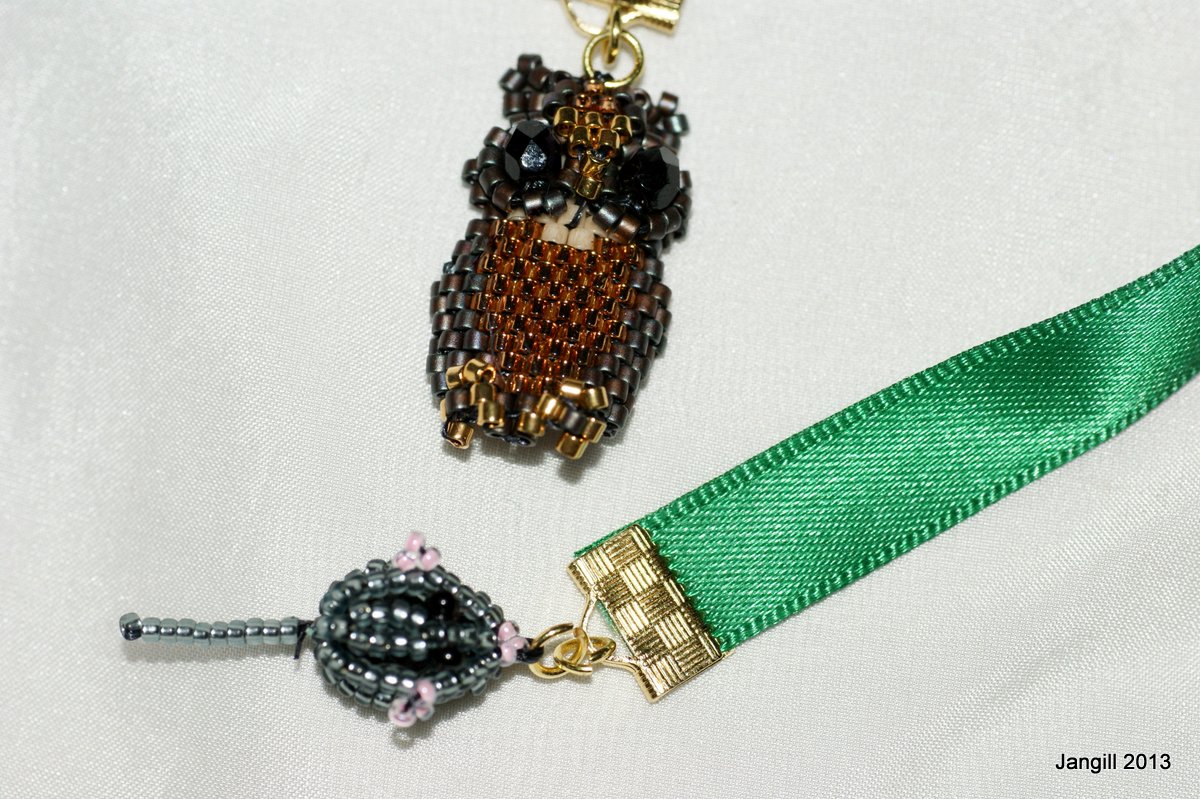
Owl Bookmark Review.

I absolutely love owls and owly things so I was really pleased to get the chance to review this little bookmark kit.
The kit is produced by The Spellbound Bead Company who are based in Lichfield. I have bought kits from them before at their regular stand at the NEC Craft shows. I had yet to be disappointed.

On opening the kit, I found absolutely everything needed was provided, including masses of thread and a very fine beading needle. The tiny delicas were even and consistent and there was a range of opaque and translucent beads to add variety to the work. The instructions were produced on a quality printer with neat, colourful and informative diagrams. Alongside the instructions was a piece on how to complete the main stitch used, ie Brick stitch. The different parts were provided in labelled bags.

The beads in this kit are necessarily very tiny to produce all the detail required. I needed help in the form of a magnifying daylight lamp, but I am 50, need glasses to read now and live in a dark house :) You may manage much better than me but you will need keen vision and good light.

I have done some brick stitch in the past, but before starting had a practice following the instructions, both as a reminder and to get a feel for the tension.

The project got under way without any problems and I couldn't fault the detailed instructions with very helpful diagrams. The mouse is very easy to complete, the owl requires some patience and is best completed after some simple brick stitch projects so that you know where the first bead on each row will sit.  The quality of the materials really helps this project work, any unevenness in the size of the beads would have spoiled the effect. There was plenty of each kind of bead in case of any mishaps and a full reel of Nymo thread.

From this kit you will learn how to complete Brick stitch as well has how to make the owl and mouse. It also shows how to make a bookmark in a way that could be transferred to any small beading project.

This is a lovely fun little project which I really enjoyed. It could be completed in an afternoon, probably much quicker if you are a regular beader. The finished project is gorgeous, the tiny creatures measuring just over an inch each in length (with the mouse's tail :)).

The cost of the kit was £8. It isn't cheap, but what you get is a well sourced kit with quality materials and well produced instructions. It has been put together with great care and attention to detail. It is also a novel item you are unlikely to see anywhere else.

I have yet to find a kit by this company that I wasn't totally pleased with and am happy to say this one was no exception. I have no connection with the company and will earn nothing from this review. I am happy to recommend them just because I think they are so great. Why not pop along and see them at
www.spellboundbead.co.uk

Hope you are enjoying your weekend,

Janice x


Friday, 5 April 2013

Making It

Hi Everyone,

Hope you are all geared up for a great weekend.
Tomorrow it's my OH's birthday. Having a birthday dinner on Sunday, and an evening out tomorrow. Next year is the big one :)

Today I just wanted to show you some of the things I've been making this week. Two of them are going to be the subjects of reviews next week as they are made from kits. It would be great if you could let me know what you think of them before I publish the review.

The first one is from the Spellbound Bead company not far from here in Lichfield. They are regulars at the NEC Craft show and this kit was bought from the show this March. I love owls so this bookmark just had to get done straight away. The tiny little mouse is a lovely touch. It has a home to go to on Monday.


The second kit isn't quite complete. The cathedral window panel needs sewing to a little 5" square pin cushion. I just need to buy some stuffing for it. A good excuse to pop into the Sewing Centre in town.
The panel is all hand stitched as it is quite small. I love that cathedral window design and have plans for a full size quilt using this technique.

Finally is this little crystal paperweight. It is an item I was hoping to add to my new WOWthankyou shop but it is stubbornly refusing to be photographed nicely. I think I will have to wait for a nice warm bright day when I can get the white tent out. I think I may be waiting some time :).
I love reading your comments, so please feel free to leave one,

See you tomorrow,

Janice x


Thursday, 4 April 2013

Laugh in the Face of Fear.


I'm starting writing this post without a title because I want to think of one that is upbeat and forward looking and it just hasn't come to me yet. Possibly because I have reached a very scary point in getting my business off the ground.

Maybe I should explain a little back ground first and then let you know where I'm at and the current dilemma.
I've been crafting for many years, making clothes for myself at Uni, later for my children, painting, paper crafts and so on. It was a way to save money and an enjoyable past time.
As the children grew up I started to use this hobby to make a little money on craft stalls and by working freelance as a designer, demonstrating for a well known craft materials company. It meant I could go to work part time and be at home for the children as much as possible. Things were going nicely until we had to move back to Wales. I could no longer continue demonstrating and so went into full time work. It was a strenuous job with a strange working pattern and long hours. Thoughts of earning a living at my beloved crafting were put to the back of my mind.

Last year saw everything change. I was made reduntant in May and my partner in June. Fortunately my partner got a new job straight away and I spent the next couple of months packing and moving. I got a 12 week Lab job to cover while someone was off after an operation, from the end of September. Since then, the beginning of December, I have been working towards getting a business running. Without the safety net of a part time job.

Hand painted Swarovski Crystals
Now, I have suddenly got the colly-wobbles. I am unsure whether I will succeed, can I reach a big enough market for my work, will I be able to settle to a sensible ratio of work hours to free time? Will the business start to earn before financial pressures force me back to finding a job? Is the economic climate going to strangle the fledgling at birth? It is a fear that has kept me in work for years.

I have to beat this fear. It makes every sale harder because it comes across in everything you do. It eats away at your confidence and suddenly, the tasks that are easy and enjoyable become hard work and the tasks that were hard work become insurmountable obstacles.

How am I going to do that? My strategy this time is to take one small step. Find one new outlet, a new group of people seeing my work. Next week find another one. Get an honest friend to look over what I'm doing and give some constructive advice. Look back at the positive progress I've made so far. Laugh in the face of fear!

I know I'm not the only one to have this kind of fear, of feeling insecure. I know some people who positively thrive on it.
Have you had this experience? How did you fight through it? I would love to hear your story!

Janice x


Tuesday, 2 April 2013

Wire Wound Connector Earrings Tutorial

As supplies for jewellery making get more expensive, especially if made with precious metals like Silver, it becomes more worthwhile making your own connectors from a cost point of view as well as being able to design exactly what you want, creating something unique.

This connector could be used to make beautiful dangle earrings or the centre piece for a pendant. It also looks very chic pinned with a safety bin as a brooch.

I am sure there are dozens of ways of creating something like this, but this is the way I like to do it as it makes the challenge of matching earrings much easier.

You will need

8" wire of your choice 0.8mm to 1.0mm diameter
4 x head pins or an extra 6" wire.
4 x 15/0 seed beads or delicas
4 x faceted oval beads
5 x crystal bicones

Wigjig board, round and flat nosed pliers, cutters, file, hammer, steel block.

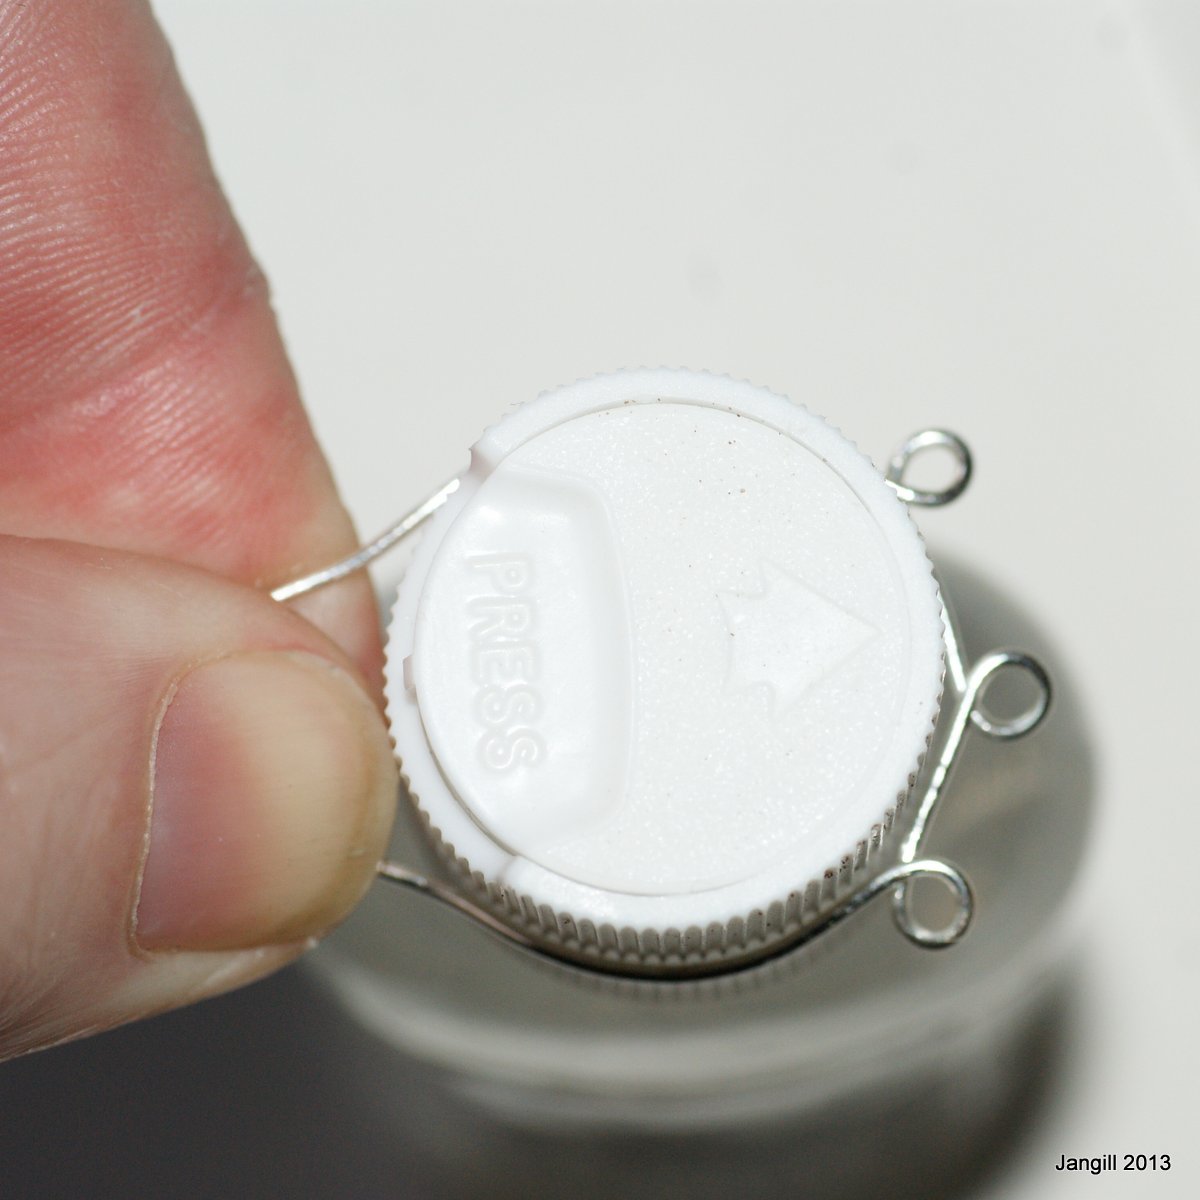
1. Set up your wig jig board with three pins in a row. wrap the wire round the centre peg roughly at the middle of your wire piece. If you don't have a board, you can use your round nosed pliers. Wrap each tail around the next peg on each side ( or make a loop about a centimetre from the first one on each side) so you have three loops in a row as in the picture.


2. Take the piece off the pins and form round a suitable shape. I used the top of a small bottle.


3. Add extra pins to your board as in the photograph (miss one hole above the centre pin, add a pin to the next 2). Return the piece to the row of pins, the middle loop will now be under the centre pin. With one tail form a figure of eight round the top two pins


4. Remove the piece and use the other tail to match the shape of the first side. Wrap this wire round the waist of the figure eight. Adjust the shape carefully till you are happy and hammer gently with a stroking motion to work harden. This stops the shape from squishing with wear. Cut off the spare tails as close as possible, squeeze ends in to the wrap and file sharp edges if necessary.


5. You can now add beads to your own design. I made hanging beaded drops with spare wire by hammering the end of the wire flat and using a tiny delica as a stop bead followed by a faceted round and a crystal bicone. I then turned a loop as described in the simple beaded earrings project. The drops can also be made on a head pin in the same way.


6. Add a beaded drop to each of the loops using your choice of beads.


You can now make a matching one for a pair of earrings (just add jump ring and ear hook) or add a jump ring to use as a pendant.

I hope you have fun exploring this design. I would love to see what you make :)

Happy Crafting,

Janice x


Craft Kit Review - Wall Hanging


Stained Glass Wall Hanging Kit - Summer Colours

Completed size 24" x 11" approx

This kit is supplied by Perfect Patchwork who have both their own website and a presence on WOWthankyou.


First Impressions.

I saw this kit advertised on Craftfest and must admit to falling in love with it straight away. It’s just the colours I love and I have a soft spot for stained glass, which I thought this replicated really well.
I ordered on a Thursday lunch time, hoping to have it with me at the weekend. Sadly, it  wasn’t posted out till Monday and arrived the following day.
On opening, I was impressed with the quality of the fabrics, neatly cut to size. Backing fabric, wadding and binding were all provided, as well as embroidery thread, beads and charms for embellishing.
I was not quite so convinced with the instructions which could have had improved photography (better lighting, detail shots) and printing (double sided to save paper)

Skill Level.

If you are happy using a sewing machine, then as a first quilting/patchwork project this would be a beginner level. As a general sewing project, it requires some knowledge and is therefore intermediate.

Getting Started

The main panel of the project is made up in a quick and easy method with no need to sew the pieces together. The shapes are traced off the provided pattern onto Bondaweb which is then ironed onto the fabrics.  The fabric provided was just enough, so care needs to be taken to make sure you complete this stage correctly. The pattern pieces are ironed on to a calico panel, then bias binding used to cover the joins and give the stained glass appearance. Again, there was just enough binding.
The next stage is to baste the panel to the wadding and embellish. For me, this was the scary bit, because the only instruction was embellish as desired. The photographs were too poor to see any examples. However, once I got over the “fear factor”, I rather enjoyed doing exactly what I pleased.


Making Up


The next stage was to add borders, first a black one then a wider toning fabric. Both these stages were very straight forward. To finish, a calico backing is added and the quilt bound at the edges with black fabric. This was the only time I had cause for concern with the fabric provided, as the pre cut pieces varied in width along the length, sometimes to less than the 2” required. A piece of calico was added while binding to provide for hanging.

Instructions

Although I managed to complete the piece, I found the instructions a disappointment. A set of numbered stages would have been helpful as I found it easy to lose where I was up to, especially as the pictures were in pairs and not numbered for easy reference.  The quality of the pictures means that you can’t see the detail which would have helped to clarify the instructions. For instance when sewing on the bias binding, should one row down the middle be enough, or should it be stitched close to both edges?

Skills Learned

As I have never made a quilt before, or done any patchwork, this was always going to provide some learning opportunities. I was hoping to do some sewn together patchwork but this project uses a simpler method with the Bondaweb. This is quite a common method for decorative items and saves a lot of time. The project does, however, introduce you to putting a quilt project together, including binding. The methods used are not the most advanced (no mitred corners for instance) which makes this a great beginner project. This is slightly at odds with the lack of instructions or examples for embellishing.

Value for Money

This kit cost £14.95 plus postage.
I was impressed with the quality of the contents and considering how well the finished item turns out, this is great value for money. You could obviously get all the components together yourself for less, but care has been taken here to provide beautifully compatible colours and designs of fabric. You also get the design and instructions.

Finished Item

I am quietly pleased with my first quilting attempt and I’m eager to do more, especially with some proper patchwork. The hanging looks great on my wall. Because the components were of good quality, the piece looks eye-catching and bears up under inspection.

Time to complete

Complete in a weekend without too much trouble.

Conclusion 

Good points: Great quality components, good value for money.
Bad Points: Not informed that would not be posted for 3 days, instructions
Overall I really enjoyed this project and am keen to do more. If you don’t fancy having a go yourself, Perfect Patchwork sell completed hangings for a very reasonable sum.


Find them at www.perfectpatchwork.co.uk or on WOWthankyou.

I would love your thoughts on this review. Is there anything else you would want to know?

Happy Crafting,

Janice x 


Monday, 1 April 2013

Wall hanging completed :)

Hello everyone, hope you have had a great extended weekend and had some time off to do what you really like doing.
A few days ago I posted a picture of the project I was working on. It is, as you can see, now completed. I am quietly quite pleased with it as it is a departure for me from my usual sewing. Just recently my sewing machine has only come out for fancy dress costume making :)

I would love your opinion on the finished project, so please feel free to leave a comment. It is a kit that I will be posting a review for later.
The finished wall hanging measures 24" by 10.5" approx and cost £15 plus postage. Everything is included except general purpose thread. This colour way is called Summer Colours. 

By the way, I have joined in with Ultimate Blog Challenge again so will be aiming for a post every day for the month. Everyone is welcome to come and join in with the aim of improved networking, visitor numbers and comments. To all the visitors from UBC, Welcome - I hope you enjoy reading a bit about crafting, photography, art and gardening. Well the gardening will feature a bit more once the weather improves :)

Happy Crafting, blogging or reading,

Janice x