Thursday 31 January 2013

Challenge Completed - 31 posts in 31 days :)

Ultimate Blog Challenge - publish 31 blog posts in 31 days

I had a simple aim at the beginning of this challenge - just to get into the habit of blogging. Just that.

I wasn't sure I would make all 31 days, especially as I started 3 days late. But I surprised myself and got there.

And there is so much further than I ever thought it would be.

I got well over 1000 page views in the month, over 100 of them in one day.
My facebook page likes went from about 30 to over 100

I've gone from no blog followers because my links broke before I started, to over 50.

The great thing has been the interaction with my visitors. The more posts I put up, the more comments I got,  the easier those posts became to envisage, write and publish.

I found out that people like the style of my tutorials, so from now on I will be uploading a new tutorial every Tuesday. There's a new challenge :)

I have a whole lot more confidence now that I can make my dream come true - make a living just from my creative endeavours. There is a whole lot more to do, but the hard bit of marketing my work no longer seems like an impossible climb.

Thanks to everyone who has organised and taken part in this challenge. It has been illuminating to read all your blogs and I think there will be many hours reading and applying some of the great advice. Good luck to you all and maybe see some of you at the next challenge :)

Best Wishes

Janice x

Wednesday 30 January 2013

Blog Give Away - worth up to £50!

Yesterday was a brilliant day - I made it over 100 likes on my Facebook page and over 1000 page views in January alone on here.

Hitting the 100 likes meant I had the pleasure of fulfilling my Give Away - any piece of jewellery from my website. The winner is a lady in Derby and I am just waiting to see what she chooses.

Now it is the turn of all my wonderful blog readers :)

At the moment I have 19 followers, which for the first month is not too bad.
I would like to get that up over a hundred too.

So, all you have to do is follow this blog to be in with a chance of winning any item from my website (excluding bridal) which could be up to £50 value. You can follow on Google Friend connect or on Networked Blogs.

Why not share this with your friends too :)

I will be developing this blog to include lots of hints, tips and tutorials on Jewellery making, Paper craft, Painting and Photography and having a few freebies along the way. I would love you to take that journey with me.

Best Wishes

Janice

Tuesday 29 January 2013

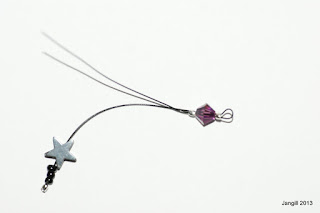
Seeing Stars - Earrings tutorial

These are a very simple make that goes really well on Craft or Market stalls.

They cost less than £1 to make and take about 15 minutes.

You will need :-

4 x Haematite stars 6mm
2 x Crystal bicones 4mm
12 x Seed beads 10/0
8 x crimp beads
10" black tiger tail cut in half
2 x Ear hook
2 x Jump ring


1. Make a bend in the two pieces of tiger tail 2.25 inches from one end, making sure both pieces are bent at the same distance along.

2. Take one piece of tiger tail and bend the end over about an eighth of an inch. Thread on a crimp bead and close to cover the end. This gives a firmer hold than just crimping a bead on the end.


3. Thread on 3 seed beads followed by a star, a crimp bead, a bicone and another crimp bead. Thread the tiger tail back through the crimp, bicone and second crimp.


4. Adjust the tiger tail so the bend makes the top of the loop and place crimp bead, bicone and crimp bead just below the loop, closing the crimps in place.


5. Add a star and 3 more seed beads. Bend the end over as before and secure with a crimp bead.

6. Open a 5mm jump ring and attach through loop and ear hook of your choice. Make a second one in the same way

If you are not very confident closing jump rings, you can use a closed ring by adding it to the tiger tail after the crimp/bicone/crimp combination before threading back through the beads.


Tip for opening jump rings

Jump rings are usually slightly open when you buy them. Hold the jump ring either with pliers or in your fingers. Open the jump ring by twisting the ring slightly towards you on one side with pliers. Don't pull your hands apart as this distorts the shape - it is just a small twist of your wrist. Close by holding and twisting in the same way, giving a few tiny twists back and forth letting the ring seat level. You will feel little clicks as the ends touch. The little wiggle work hardens the metal so that it stays better in place.

Hope you like this tutorial and maybe it will give some inspiration :)

I would love to see your version if you try this - Happy Crafting, Janice

Monday 28 January 2013

Beauty and the Beast

 Just a few of my pics from last year.

If a picture paints a thousand words I don't think I need to say any more :)

Which are the beauties and which the beasts for you?


Sunday 27 January 2013

Butterfly Thoughts

Hi there. It's Sunday and Janice is off doing what Sundays are for, time with OH, cooking a Sunday Roast and enjoying walking without snow underfoot :)

So I thought I'd tell you a bit about myself.

I was born in Austria at the Swarovski factory, the best place in the world for any crystal to be conceived.
My butterfly shape is flawless with facets that catch the light and sparkle sending rainbows across a room. Some of the light bounces inside me and creates a myriad of internal reflections so I look like there is more of me on the inside than the outside. A bit like a TARDIS for any Doctor Who fans :)

I was packaged up with 71 of my siblings and then sent out to Jangill Designs in the UK.
This is where I was transformed into the unique butterfly with glorious colours. All 72 of us are hand painted with different shades so that we are now a little bit different to each other. It's great to be an individual just like you :)

After painting we are warmed up so that our new coats never fade or wash off. You could even put us in the dishwasher, but I'd rather you didn't - Sterling doesn't like it!

Sterling is the Chain and bail that carries me. He's chosen for his quality and beauty too. Janice says there is no point getting something cheaper to carry me because then I might not be so well loved, just for the sake of a few extra pounds.

Now I'm sitting in a lovely box, ready to make someone very happy. Maybe I will be a birthday present or a Mother's day gift. Or perhaps someone will love me enough to send to someone special for Valentine's day. Whichever, I can't wait to fly again, enjoy the light and be treasured.


Why not have a look on Janice's website, Jangill Jewellery or say hello on facebook where you can win one of us for just liking the page Jangill Designs. She has also just started on Pinterest as Artisanjan

Saturday 26 January 2013

My Peaceful Place

Yay for the weekend and getting to spend time with OH :)

Yay for the weather showing some sign of improvement....marginally. Due for a downpour but at least the treacherous ice and snow have almost gone. We did actually see some sunshine briefly and taking a walk it almost felt springlike.


I'd like to share some pictures with you today of a special place for me. It isn't beautiful in the classic sense of the word, but it has a serene beauty and amazing peacefulness that is quite awesome. It's a place to let everything go and to be still.


It's name is Llyn Fawr, which in Welsh means Big Lake. It isn't big at all :)
It lies at the top of a mountain where the ice of ancient glaciers gouged out the basin. Once the Ice Age retreated it left behind a glass clear lake.


The site is designated as one of Special Scientific Interest for the flora and fauna that abound in this largely undisturbed spot. Access is allowed via just one path and there are strict limits on where you can wander to protect the rare species. I have yet to meet anyone else there when I have visited.


Do you have a favourite place? What emotions does it bring to you?

Friday 25 January 2013

Floral Card Digital papers and flowers

This is the finished card from my own photographs used as background papers and floral embellishments.

I photographed a piece of hand dyed silk as the background paper, adding a faux stitched edge.
The large flowers are a digital print of a silk flower brooch. 
The greeting is a Papermania element with added faux stitching.
The background card is from Once upon a time matt stack.
Metal heart charm is hung from a papermania heart brad.
Sticky ribbon is from Anita's range.

I would like to enter it in the following challenges

LEJ Designs - Stitching Real and Faux
Happy Campers Challenge -Flowers/Digital
Tsunami Rose Designs - Anything goes
Fab'n'funky Challenges - Favourite colour combo ( turquoise and purples )

Thursday 24 January 2013

Crafters Curse - losing the muse.

I, like many crafters, am guilty of starting projects and then leaving them when the muse walks out the door or when something much more interesting/urgent/appealing turns up.

Once left these projects fester annoyingly at the back of the mind demanding attention, urging you to finish them. But you press them away and they get heavier as time goes by. Even more so when you relocate and they trudge along with you, sadly packed away, unwanted and unloved.

At the moment I have at least 6 such projects :(
So I thought I would give a couple of them some fresh air and let them be seen.


These 2 canvases are related. They were started at the same time while I was working on an exhibition.


I think they both need to tell a story, but somehow I seem to have lost the plot :)

They both need a focal point. The first one maybe butterflies, perhaps as 3D elements

The second I just don't know. The moon needs it's face but the rest I am not sure.

I think I shall print them out and use as backgrounds for scrapbooking and cards and see if that will give me any more inspiration.

What are your thoughts? Do either of these speak to you?

Craftfest - amazing selling opportunity.

I am just one post behind schedule after my Manic Monday. I am so pleased to have kept up and hope now that blogging sticks as a habit :)

For all my fellow crafters, this post is to let you know about an On-line craft festival taking place in March.

It only costs £5 for a virtual stall and there are no commission charges. You handle all the sales yourself by providing a picture and link to the items you want to sell. The items could be on Ebay, your own shop or just link to your e-mail address to follow up. Last year there were over 100,000 visitors!

I have booked a stall myself and there are over 100 booked already. For the cost I thought it was worth a punt :)

Join Creative Connections (free) to book your stall for Craftfest

Happy crafting and Happy selling :)

Wednesday 23 January 2013

Free Craft materials.

Crafting can be quite an expensive hobby. Papers, toppers, stamps, cards, inks, powders, tools.... the list goes on.
I find when I buy papers for instance that I like the look of a few designs then find it difficult to use the rest of a pack. My stash grows but I still need more:)
With the advent of digital papers we don't need so much stuff, but it can still be expensive to buy the disc and it often has quite a lot of stuff we won't use.
In all the stash I have today I couldn't quite find what I wanted, so I made my own by photographing things in the house. Firstly, I had some silk I had dyed in shades of lavender and turquoise, then some jacquard fabric. Several shots later and I had another idea. I had made a flower from silk ribbon. I thought it would make a lovely topper but it would make a card quite expensive to add it directly, so I photographed that too, then photographed it on the silk.

For simplicity I used Picassa to edit the photos, increasing the brightness and softening the focus. These are just one click operations so really easy. Cutting out one of the flowers and layering it over the one on the silk gave a nice effect and I could envisage a design forming.

The last picture shows the basic card which will have a greeting added. It's not quite there - I think the flower motif is too central top to bottom to work really well, but the process definitely works.
So there we have it - free background papers and toppers and it is completely unique.


What do you think? Do you do anything similar?

Tuesday 22 January 2013

Moving Day

I didn't get to blog yesterday because I ended up with a rather long driving day so will have to play catch up. That will have to wait until tomorrow as today got messed about as well.

I seem to be one of those people to whom things happen, nothing goes quite to plan. I have learned over the years to take things as they come and adapt as well as possible.

My son is moving house and has a lot of stuff he wanted to get back to their owners - a couple of sofas back to my daughter, a PA system back to my son-in-law among other things. Sounds straight forward. Not exactly ...... My son doesn't drive. He lives in Mid Wales, my daughter lives at the northernmost tip of Wales and my other daughter lives with her husband in North Staffordshire.

I got roped into driving a van from where I live in South East Staffordshire, to Mid Wales on to North Wales round to North Staffordshire and finally back home. It's just over 300 miles altogether with loading and unloading on top.

The day dawned. Four inches of snow and still snowing. Underneath that the melted and refrozen remains of the previous three days snow. To many places around the world, this does not sound like very much, but our infrastructure just isn't designed to deal with it - no snow tyres, snow chains, decent snowploughs etc. The temperature creeps above zero each day, the snow starts to melt but then refreezes overnight to give a skid-pan of ice beneath the new layers of snow.

The van hire place is about a mile away so I walk rather than chance taking the car and leaving it there. On arrival I filled in all the necessary forms and went out with the assistant to the van. This was where the problems started. On inspecting it there was a flat tyre. Oh, says the assistant," I'll just put some air in that, we had to let the tyres down to get it out of the snow". The tyre had other ideas and stubbornly refused to inflate.

Back to the office to fill in another set of forms for a second van. Meanwhile a couple of guys had to dig it out of the snowdrift! I eventually got going an hour after I had arrived. Fortunately, the van had a good amount of fuel in and I could set off for Wales without delay. The journey was a little bit hairy with some smaller cars struggling for grip and not stopping where they should. As I progressed towards Wales the snow eased and I arrived at my son's house by noon.

I had promised to call my partner when I arrived to let him know I was safe, so took my phone out only for it to squirt right out of my hand. It shot between the seats, bounced off the cabin back and shot under the seat. This sounds easy enough till you realise there is no access to under the seat from the front. There is very little access to under the seat from behind either. I wondered what else may be in the land of under the seat. An hour later and the phone was finally retrieved, fortunately nothing else seemed to have kept it company.

Now, however the van was loaded and we could head for Anglesey. I decided the mountain and coast road was possibly not the wisest choice so opted for heading to Chester and taking the route across the A55. A longer distance but less likely to have problems. It worked and half way along the route, the snow disappeared. It looked like this leg would go to plan.

In fact, apart from losing a little more time it all went smoothly and we set off on the last leg delivering the PA. We drove back towards England and back into the snow. Now of course, it was evening and dark. The roads were clearer, however, until we arrived at my daughter's house. The small cluster of houses had not benefited from any attempt at snow clearance. The arrangement of the houses is such that the roads double as parking with only just enough room to get a car through, no turning space here, and the house at the end of the cul de sac. I had to get close as carrying a PA any distance was not going to be practical. I decided to leave worrying about how to get out again till later.

The PA went in the garage and my son and I went inside for a cuppa. I set off for home leaving my son behind to make his way back to Wales next day on the train. Just the small matter of reversing a long wheel based van out of a space giving only about 6" of room each side.... in the snow....on ice. I must be crazy!
After some expert guidance from my daughter I made it safely to the main road and arrived home 13 hours after I left.

I picked up the message on my phone. Nooooo ........ my son had left his wallet and various bits in the van.
Hence today's plans had to be revised. But that's another day......

Do you go with the flow when your plans don't work out or is it really stressful?

Sunday 20 January 2013

Getting Mucky :).

Yesterday I included in my blog some photographs I took during the last couple of years. They are pictures that had then and still have the power to move me. They recalled the scenes to my mind and I could almost touch the grass, feel the breeze, taste the cold mountain air. That made them great pictures to follow up with a painting. I had more to put into the image than just recorded photographs and simple sketches done at the time
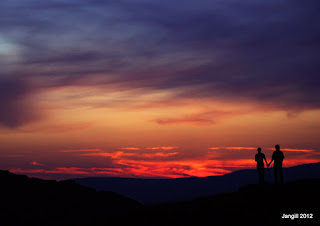
 My most used medium is glass paint on glass, but with these I wanted to use a technique that originated with stained glass windows. It is known as reverse painting and involves painting all the near details first and followed by more distant things. The problem is that you will view the finished painting through the glass, so you cannot see exactly what you are painting as you do it. The sunsets are ideal as they only require a silhouette first followed by a great deal of fun with the skies.
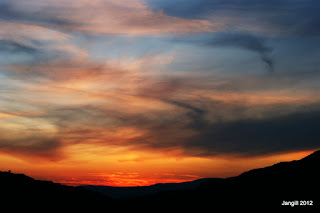
I really enjoyed this sky. I painted bands of almost pure colour and moved them through each other with my fingers. If you don't like getting your fingers dirty you can always use vinyl gloves, but the feeling of the paint to me, is quite sensuous. I introduced some complementary colours, blue with the orange, purple with the yellow, to create a range of greys to look like wisps of cloud. The darkest cloud was added as a mix of dark blue and violet.
While this may not be the most accurate representation, getting physical with the paint was pure joy and brings back the feeling of the moment on the mountain much more acutely.

It's also a great way to get out of a rut if you are stuck for ideas. I got plenty after this - background papers created like this for cards and finished with silhouettes. Using little pieces from prints to create quilt like patterns, dying a whole cloth quilt and adding dark details like swirls or arches ......

Why not get mucky with your medium and see how liberating just enjoying the process can be? I'd love to see what you make - let me know what you get up to :)

Saturday 19 January 2013

How to shoot great sunsets.

Whether you are an aspiring photographer, want an emotive picture for your blog, or simply want a lovely picture for the family album, we all love a great sunset. How many times though have you looked at your picture and been disappointed with the result. I bet, like me many of you have felt that the sunset looked better how you remember it and get a sinking feeling knowing you can't get that moment back.

Settings on your camera. 
The most important thing to get right first of all is your camera settings.
When you take any picture your camera works out how light the scene is and calculates a mid tone. Sunsets are generally quite dark so the camera over exposes, moving the darks up to mid tones. You need to tell the camera who is boss. Some cameras have a sunset setting to use. DSLR cameras allow you to over or under expose your shot ( according to the camera) and this is the setting to alter. You want to underexpose by about 2 stops. This is a bit hit and miss though, so it is worth taking shots at different exposure levels (known as bracketing) to see which works best. The colours on your screen should not be relied upon here as the picture looks more intense there, than on your computer when you get home.
Always use the best quality setting your camera has. This is not the time to save space with a lower resolution. If you have a RAW setting and are happy doing basic post production work, then go with that, otherwise the best jpeg setting.

Keep it Steady
Sunsets, despite what our eyes tell us have a low level of light, so the time it takes for your camera to take the picture is going to be quite long. Keeping it steady on a tripod is the best option, but you could also look for a wall, fence, bollard etc to lean on.

A tripod gives you the option to take very long exposure shots for some very different effects. The picture at the top was taken over 30 seconds.

Think about mood
What do you want to convey with this picture? Is it peace and tranquillity, natures awesome power, fiery colours, etc. This will affect how you take the picture too.
For instance, taking a very long exposure could quiet the ripples on a lake to give that sense of complete calm, a fairly long exposure on a windy day will give movement to clouds and give the picture great power.
Underexpose even more to give a silhouette against intensely coloured skies.

Take lots of shots
Alter your settings and keep shooting to give yourself the best chance of getting the one that makes you sit up and say WOW.

Digital Darkroom
Some people are afraid of altering their pictures once captured, but you shouldn't be. It's not cheating - it's getting your picture closer to the vision you saw. Your camera looks at the world in quite a different way to your eyes, or rather your brain, but that's another story. Picassa is a very simple programme that allows you to alter the picture in simple ways. For sunset pictures you will probably find the warmify tool useful as it brings out the colours. The trick is not to make drastic changes as these start to introduce noise ( unwanted dots of colour ) and reduce the quality of the shot, as well as looking unrealistic. More advanced tools are available free online. One I like to use is gimp.

This is just a very basic guide, what have you found gives you sunset pictures to be proud of?

Friday 18 January 2013

Dragonflies tutorial

I love dragonflies and butterflies and a project making some while the snow gets ever deeper outside is just the fillip I need. Winter is not my favourite season as the short, dark days and long cold nights seem to disagree with me. I dream of spring and a new lightness that seems to manifest itself in the airy grace of these lovely insects.
These are the fruits of a morning's play .... I mean work :). The tutorial describes how to make the green one.

You will need the following

12" gold tiger tail cut into equal halves.
7 crystal bicones 4mm (I used 3 shades of green)
4 x dagger beads 12mm long
3 x gold crimp beads
1 x crystal bicone 6mm
2 x seed beads

 Lay the tiger tail pieces side by side and join together with a crimp bead. Use crimping pliers to close the bead or squash with flat nosed pliers.
Thread on the seven 4mm crystals in your desired pattern. I used 3 shades in the pattern ABCABCA.
Follow these with the 2 seed beads one on each strand of wire, then 2 dagger beads on each wire.


Next, thread each strand through opposite sides of a bicone and pull tight. Now thread one strand back through dagger beads, seed beads, the other pair of dagger beads and the bicone to make a full circle back to where it was. This will be hard work but helps stiffen up the dagger beads so they don't flop around.

Finally, thread a crimp bead on each strand. Thread the strand back through the crimp bead to form a small loop and squash the crimp. Trim the strand to half an inch and push through dagger beads to cover. Thread a chain through one of the loops to create a pendant.

You may notice if you follow the instructions that I have left out the black seed beads near the head. I thought the project would look better without them. The other 2 designs are made very slightly differently, but the fun is in making adjustments so the project becomes your own. I have already thought of a couple of tweaks to try for the next one I make.

What projects or activities cheer you up when you are under the weather? Do you like to curl up under a blanket with a good book or get active?

Thursday 17 January 2013

Killing with kindness? Angel wing in waterfowl.

Healthy Swan at Bewdley
This morning I was looking through my photos for last year when I came across some I had taken in Bewdley, Worcestershire. It is a small town sitting by the River Severn, with shops and eateries overlooking the water. There are easy walks along the banks and benches provided for resting and just taking in the surroundings. There are plenty of visiting wildfowl to observe and admire.
Close to the town swans, geese and ducks can all be seen at quite close quarters. Children feeding them and jumping with glee reminded me of many a happy visit to a lake or pond as a child.
Duck with Angel wing

Unfortunately, many of us choose to feed them white bread and may be causing them serious harm. If a young bird is overfed or eats an unbalanced diet it can develop a condition known as Angel Wing. This causes the wing to stick out at the wrist joint and means the bird is totally unable to fly.
There are two cause of this:-
           * Overfeeding - the bird grows fat and the joint distorts
           * Malnutrition - most likely a lack of vitamin E, so the bird does not develop properly

The best way to avoid this is to feed them something more akin to their normal diet. Fortunately, there are plenty of things in our kitchen and at pet stores that are great to feed wildfowl.
   
Seeds such as barley, wheat and cracked maize are ideal. Defrosted frozen peas, lettuce, potato peelings and other chopped vegetables are also good.

The only problem now is what to do with the left over bread? I put mine in my garden wormery, along with lots of other kitchen food waste to be broken down into great compost for the garden. What would you do with yours?
Have you seen any advice on feeding waterfowl that you would like to share?

Look forward to hearing from you :)


Wednesday 16 January 2013

Is this a dagger I see before me?

This morning is the coldest of the year so far for us in Staffordshire. Outside everything is frozen. The grass is rimmed with hoar frost, the bird bath is a solid lump of ice, the yard an impromptu skating rink. This, I think is a day to stay inside.... crafting.....shame :).
First things first though, my garden visitors will need some water and fresh food. I have seen a very shy Robin about the last couple of days and want to encourage it in the garden.
By the time I'm togged up and out there, it has started to snow, just a tiny dusting. Having sorted out the bird table, I notice the the settled snow. It's so cold it isn't melting at all but there is so little of it there is not even a single layer. The individual flakes stand out like stars.....no not stars....is this a dagger I see before me?
They are the strangest snowflakes I've ever seen. They look like tiny double ended daggers.
Intrigued, I looked it up on the net and found these crystals form when the temperature is about -5C. Guess it hasn't warmed up here then :)
There is some really beautiful photography of snow crystals here SNOW CRYSTAL SHAPES
I had to laugh when I saw how many different kinds of crystal there are and thought about snow spotters with little books ticking off the kinds they have seen :). I'm sure plenty of people have a good giggle at me and my ecstatic reaction to going into my favourite craft shops and photographing the next thing I want for my burgeoning stash.
What about you, is there something that sets you off in an ecstasy of ooohs and aaahs?
(Apart from that, lol :))

Tuesday 15 January 2013

Vintage Rose Gold.

This is an extra post today because I am so pleased with a project I finished today. This heart is one of a range I make from Swarovski crystals. I use Swarovski because I love the clarity and sparkle they have.
I use clear crystals and hand decorate them to produce an individual range of colours. All of them have 2 or three colours and a range of tones. I tend not to use single colours as they are readily available in the Swarovski range. This is one colour way I experimented with yesterday. I've called it Vintage Rose Gold.
The gold is made from mixing Silver and yellow paint, the rose colour by adding a touch of magenta to the mix. I make my own gold coloured paint as I think the ready available one's are too brassy for my taste. The pink was painted on first, followed by the gold, making the tone paler towards the centre. I do that so plenty of light gets to the centre of the crystal giving that gorgeous sparkle. I think this fits in with a vintage or shabby chic style in particular, and love it's femininity. Would love to know what you think :).
Why not have a go at making one of these yourself - all you need is a clear crystal and glass paint - the kind you fire which makes it waterproof and scratch resistant. I finished mine with a sterling silver bail which needs no tools to attach. Just open up the legs, slip over the crystal and squeeze shut. Add a chain and you are ready to go. This can be completed in a weekend - paint one day, fire the next morning and make up when cool in the afternoon :)

Monday 14 January 2013

Valentine's Day Gift giving - something different.

Valentine's day has a long tradition It's actual origins are somewhat lost in the mire as are many of our current celebrations. One of the first associations of love with the Valentine is accredited to Chaucer. By Shakespearean times the tradition was well followed as mentioned by Ophelia in Hamlet.


To-morrow is Saint Valentine's day,
All in the morning betime,
And I a maid at your window,
To be your Valentine.
Then up he rose, and donn'd his clothes,
And dupp'd the chamber-door;
Let in the maid, that out a maid
Never departed more.
—William Shakespeare, Hamlet, Act IV, Scene 5

Today we often send a gift or a massed produced card as tokens of our affection. 

I would like to encourage you to think outside the box.

Last Valentine's day, I suggested my partner didn't send flowers. How expensive do they get from a few days before? And an ordinary card from the High street is the same for something that cost a very few pence to produce. 

So instead of a gift to each other we decided to get oils for a massage. A gift to each other that really showed we cared. Never tried massage? Don't worry - its really easy with loads of information on the net. And you will soon get the feel for it :)

There are lots of unusual gifts in the hand-made or designer market place that are great for Valentine's giving too.

This is from a designer local to me who decorates wooden ducks.

All the created ducks sell really quickly. They are all individual and you can even ask for a special design. 

Lovingly created they are great value for money as there is not a huge selling chain before they reach you!


This very up to the minute card is one of many Vintage style designs from a good friend and former colleague of mine who can now be seen on Create and Craft TV. 


You can follow her blog at Just Jo

Look around in your own area and there are sure to be some card designers selling at stalls or in other businesses such as flower shops and craft stores. 

A Designer made card that shows the extra effort you have gone to finding something just right is sure to be a hit.


Lastly, if you can't resist that eternal symbol of love, a red heart, this Swarovski crystal heart is sure to be a hit.

Designer crafted at a fraction of High Street prices, this sterling silver pendant can be found at Jangill Jewellery

It's available at a whopping 50% off at the moment so worth getting in there before the end of the month.

With a month left to go before the day, why not start looking now.

Do you have a tradition for Valentine's Day? - I would love to hear about it.

Sunday 13 January 2013

Blogging, Birds and Buzzing Brains

The more I do of these blog posts and read of others while completing this challenge the more ideas spring to mind. The aim may be to get more traffic to my blog but one side effect has been to get my brain buzzing with ideas :)
I had several thoughts on today's post, but eventually decided to show you some of my photography with a message about feeding birds.


I love to see birds in my garden and always have water and food out for them. Moving to a large town recently I thought I wouldn't get as many visitors but I have been pleasantly surprised. One of my favourites is the Robin. I discovered recently that the bird we call the robin in the UK is not the same as the Robin of the USA, so do not be surprised, readers from over the pond at the photographs here :). I also find out some interesting facts. For instance, as Robins bring up their nestlings they stop grooming themselves to make time for the endless collection of food for their growing brood. As the season moves into late spring the birds look very bedraggled. It is not until the young have flown the nest that they grow a whole new set of feathers and lose the old ones ready for the oncoming winter.
The first picture here was taken early in the year just as the eggs have hatched. By the second picture, taken in late May, you can see how the plumage has become bedraggled. In the last picture, taken in July, the new plumage is evident and looking fabulous.
In the spring I used to put less food out thinking there was plenty about. Now I keep putting my Robin mix out so there is some food easily available :)

Saturday 12 January 2013

Royal Portrait Disaster?

Hi all, hope you are having a great weekend and keeping warm in this cold spell. I'm not looking forward to the forecast snow as I tend not to be very good at staying upright in it :).

As an artist I like to keep up with Artists and Illustrator on Facebook and spotted an article about the new portrait commissioned of Kate, Duchess of Cambridge. It has had a mixed reception. Most commentaters on Facebook disliked it, saying it made the Duchess look older than her 31 years. The art critic for the Sunday Times called it "disappointing" and for the Daily Mail said it was "a rotten portrait".

The Artist, Paul Elmsley, is noted for his portraits such as his drawing of Nelson Mandela. He has won numerous awards and is undoubtedly extremely skilled. It is a tough gig however to capture the likeness of someone who has become photographed so often in a way that will please the majority.

My own personal feelings are that she does look in her forties in this depiction. I would also have preferred that the true colour of her eyes was depicted. The worst thing for me however, is the smile that does not reach the eyes and thus appears as a smirk. Not very endearing.

What are your thoughts on the first official portrait of the future British Queen?